Friday, October 18, 2013

Quilt for a Rainy Day Continued...

Well I learned that I can't really make a quilt in one day. I like to tweak them to much. I started one thing... then it changed... then it changed again.


I made my first blocks to big. (This is why you don't do math when you have a cold!) Then I changed the other ones to make for smaller blocks instead of one large one. 


Overall I love the outcome so much better! I have one more seam on the top and then to add a boarder. Once I do that I should be able to tie it... AWESOME! I love it. Super soft all homespun fabric! I will post the finished quilt soon.

Thursday, October 3, 2013

Little Quilting to Brighten Up a Cloudy Day

As the weather turns colder we have been enjoying the open windows and fresh air. I love the evenings where we can enjoy a light quilt over our laps on the couch. This past year when my grand parents estate was settled, my mother gave me a little lap quilt she had made for my grandmother, many, many years ago.


We have several quilts to cuddle with on the couch, but this one is soft and worn from many years of use. Though we love to be warm with it, I want to retire it from use to a safer place as it is threadbare in a few places.

Today I pulled out my stash and looked through some of my Pintrest quilt photos so I could find some inspiration for a simple, quick to piece, fun to tie... quilt.

I choose this photo for inspiration...


 and went to my warm, soft homespun's for the choice. (though not as colorful... they are way more cuddly than batiks)


I now have my trusty Kenmore 158.480 out and ready to sew. Stay tuned for the finished top!

Wednesday, October 2, 2013

What Plants Go in a Cold Frame for Fall and Winter


Plants

When to plant
When to harvest
 Virities and Links to order online
Cichorium
Radicchio
Endive
Chicory
Frisee
Escarole
Sugarloaf
Dandelion
Mid July
Unfrozen

Many others, these are the ones I will try this year. 
Swiss Chard
Mid July
Unfrozen
Scallions
Mid July
Can be picked frozen
Parsley
Mid July
Unfrozen
Carrots
August 1
Unfrozen
Mustard
Mid August
Unfrozen
Turnip Greens
Mid August
Unfrozen
Spinach
September – All Winter
Unfrozen
Mache
September – All Winter
Can be picked frozen

Lettuce
September – All Winter
Unfrozen
Arugula
September – All Winter
Unfrozen
Claytonia (miner’s lettuce or winter’s purslane )
September – All Winter
Unfrozen
Minutina
September
Unfrozen
Radish
September – All Winter
Unfrozen
Leeks
Mid July
Unfrozen
Sorrel
Mid July
Unfrozen
Thyme
Mid July
Unfrozen
Rosemary

Unfrozen
Cilantro
Mid July
Unfrozen
Peas
August 1
Unfrozen

We only just finished the cold frame yesterday and I tried my best to get it planted a couple weeks ago. Didn't get to plat it when I should have for maximum growth, but this will be a little experiment. We should have a good bit of fresh greens for salads and juice. The things I can plant all winter, we will be having lots of those. 


I grew this Dinosaur Kale for the first time this year in my summer garden. It is still going strong as a monster plant. I love to use the leaves in my juicer as they are long and narrow. 


Vates Kale is the one you see often in the store. Very curly and so very tasty. I love to make kale chips with the Vates. So yummy. My massage therapist Julie gave me the best recipe for making them in the dehydrator. Sooooo Good! I can almost eat the whole batch myself. After "cooking" for a couple hours I am in the kitchen sampling them. Last time I ate two trays before it was finished.


My husband loves radishes. As long as they are washed and ready to eat in the fridge he will munch away. Or he gets them right from the garden as he is walking in from work. I like to think of him as my "rabbit".


I love beets! Roasted, pickled, steamed, greens, and any verity. Though maybe my favorite is the golden beets.


Cleaning out my seeds this fall, I found I had five different envelops of spinach. I choose three and planted them all. This one that I bought in bulk at the feed store was the only one to come up. I have not had the best of luck with spinach in the garden. Though I love it! So I hope this one keeps going strong. I will be planting more this week.


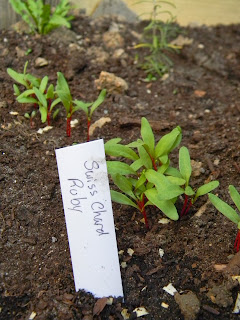
With my mother being from Alabama, we grew up as children eating lots of greens. Collards and Swiss Chard were more common in our home. Swiss Chard is so much like spinach, but some days I think even better. The smell of it steaming in the kitchen is one of the best earthy smells. YUM! Think I know what I will be having for lunch tomorrow.


My first time planting onions from seed. I got these three from Seed Saver Exchange in Iowa when I was out there for my sister-in-laws wedding. So want to go again in the middle of summer. Can't wait for these to get even bigger! 

Tuesday, October 1, 2013

It is finished!  YAHOO!!!!
I am so excited I could explode! 
4' X 14' Cold Frame


It took way to long to paint the windows and have them ready to go. Special thanks to my sister who helped me last weekend, and a extra thank you to my massage therapist Julie for giving me these windows last year. She, like me loves to garden and this is something we have talked about during many a massage sessions.


This is the thermostat sensor that is tells me what the temperature is from the comfort of my kitchen counter.


I love how easy it is to see what the temperature is and know when to go open or close the frame. For those who may or may not know. 

You want to keep the inside of the Cold Frame colder than warmer. Below 75°F during the summer Below and 60°F for the spring and fall. When it is about 40°F you want to start venting and anything above 50°F take the lids off or open the all the way. Don't forget to close the lids in the cooler evenings. 


The one thing we still are working on is the ropes that help with the venting. Right now it is all manual, we are thinking of adding a crank. This is my husbands idea. I love him! He likes to look for the "better" way of doing everything! If it looks like hard work, he will find a way to do it with a button. Hence my digital thermometer, vs. the one that you have to peek at from the inside of the cold frame. That is to much work when there is a foot of snow on the ground.


Here is me playing with the venting of the "lights". I LOVE IT!


This is my sweet Maggie. She loved every moment we worked on the Cold Frame. She "supervised" as she ate a larger than life kohlrabi root that I pulled for her last week and dried in the sun.

Just a few finishing touches. Some weather stripping around the windows and caulking for the larger cracks. Lets not forget that crank system my husband wants to install. I think it is a GREAT idea! If anyone knows of something that will work feel free to suggest it.

More tomorrow about what I have planted inside.


Sunday, September 22, 2013

Cold Frame Almost Finished

For a few years I have been planning and researching cold frames. Since posting photos to my Facebook page a couple weeks ago when we started our install, I have had lots of questions. I hope this post will answer some of those questions.

Cold Frames help to protect plants from the elements and provide a sheltered growing environment. Cold frames can be dug down into the earth or can be a simple box built that sits on the ground. It protects from wind, snow, frost, and extreme cold. 

I love this article on cold frames from Eliot Coleman at vegetablegardener.com. Great resource, lots of information, photos, and details to draw from. 

You can go to Eliot Colman and Barbara Damrosch 's Website and read articles they have written on gardening. Love their books and approach to gardening. 


I year ago my massage therapist was cleaning out her garage and asked me if I wanted these windows? They are 3'x4' double pained windows. Perfect! When it is finished we will have a 4'x14' garden bed/cold frame. 


After living in our house for a few years and gardening each year, I have learned which area's I do better with in the winter. This spring I made up my mind that I wanted to convert the kitchen herb bed to my cold frame area. It is easy to get to, and I do not have to move large amounts of snow to get to it. Unlike the compost bin that I have to hike out to with muck boots. 

My husband can thank his mad construction skills for the custom build frame. It is not totally finished. I still need to finish cleaning up, calking, and painting the windows. I hope this week will bring the cold frame to completion, or at least be ready for the windows/lights to be installed. Have to wait for the paint to dry before we can do that. 


Stay tuned for future post of what can grow in a cold frame, and photos of the finished product. 

Saturday, September 21, 2013

Salsa Mania


Every time I want to try canning something new, I go in search of several recipes that will inspire. When it was salsa time, a few years ago I combed the internet for a yummy recipe that would be close to what you get in a great Mexican food restaurant. I looked and looked, but came across mostly the same thing the acid used was vinegar. Then I found this gem! On a great blog about local seasonal food. SEASONAL ONTARIO FOOD by Ferdzy. She uses lime juice instead of vinegar! So I jumped in and started to make it. To date I have made about 6 batches over three years and I am sold! My husband loves it so much that when people come to dinner he brags and likes to give them away. I have to make extra each year to make up for the jars he gives away.

I grow some of the items in my garden and get the others from local farmers markets.

Salsa for Canning

yields: abt. 10 pint jars

Needed:
8 quarts tomatoes - I like Romas, but you can use other kinds.
pickling salt
6 large onions
2-3 heads of garlic
1 lb jalapenos
6 large green chili peppers (I like poblano)
2 1/2 cups minced cilantro
1/4 cup ground cumin seed (I grind mine fresh in a coffee grinder)
6 ounce can tomato paste
3 tbl lime juice per jar

1. Wash your tomatoes, blanch, remove skins, de-seed and chop coarsely. Layer them in a large strainer about 4 parts with 1 tbl spoon salt between (salt will dissolve and come off with the water). You may leave the strainer in the sink or over a bowl, but try to not let the tomatoes sit in the juice that runs off. Let them rest like this for 4-6 hours or overnight, in a cool spot (not in the refrigerator). Goal is to let as much tomato water drain as possible.

2. Peel and chop the onions, de-stem ad de-seed the jalapenos, green peppers, peel and mince the garlic. (wear gloves with the garlic and jalapenos) Squeeze the juice from the limes, or use lime juice from a bottle.

3. Take the strained tomatoes, and chop them to the texture you desire. I use a food processor at this point for the tomatoes, onions, peppers, jalapenos and cilantro. Mix the tomatoes, onions, garlic, jalapenos, chili, cilantro, cumin, tomato paste together and taste. Add salt if needed.

4. Sterilize canning jars, prep lids, have water boiler ready. Put salsa on stove and bring to a boil. Add lime juice to hot jars and fill with hot salsa. Fix lids and process jars in water boiler for 20 mins.

5. Take jars out and allow to cool. Check seals and wash jars before storage. Label and enjoy!


Wednesday, September 18, 2013

Cold Frame, Quilting, Canning, Maggie and Music Mania!

My friends and clients have been asking me what I have been up to lately. Depending on the day it is canning, quilting, working in the garden, working with Maggie's training for Canine Good Citizen or prepping a lesson for primary music time. No matter what it is, I am busy and love it!

Each day has been filled with the oncoming winter, and the need to get everything ready to get snowed/frozen in. So I am trying to finish up things in the yard with the big project this fall of getting our cold frame installed and planted. We are 75% there! Today I hope to get the "lights"/windows painted and ready to install. Peas need to get in the ground too, but the climbing support needs to get installed. Just need to get busy with it.


I have several quilts being pieced right now. Trying to finish my loose end projects, and be able to start fresh on some of the more of my larger ideas. Just want to get all the clutter out. I recently pulled out my "Lessons From Mama" book and got back to work on that quilt. Started it 4 years ago in a beginners class at the local quilt store. So this one is on the design wall and is being finished up. More on this one later


I did get my log cabin quilt finished up and to Mom's for quilting. Talking to her on the phone this week I learned it is out of the bag and hung in the entry way for inspiration.


I only got this photo of it before sewing all the blocks together. I added piano keys for a border and shipped it without taking a final photos. So I hope mom will send me one of it hanging in the entry way. Love all the colors in this quilt.

With the Fall here and a hurry to get my garden cleaned up, the last of the canning season is upon us. I need to get my tomatoes finished up, salsa, and a few more whole tomatoes done up. It is going to be epic! I think three more bushels will do it. Then I need to work on pears and apples. I would love to do more... but time is a thing of this world and it can be a little crazy when we don't have enough.


I was recently released as the Relief Society President at church and have a new calling as the Primary Music Leader. I LOVE MY NEW CALLING! Creative, fun and with loving children that are always happy to see you! Each week I try to craft a new project that will inspire the children to learn the songs that are filled with beauty and doctrine of gospel. Nothing warms my heart more than sitting next to a child, have them take the music we were just singing and read the words while trying to remember the melody they just learned. So inspiring! I love these children.


Lastly, my Maggie. She is so much love! Forever my little companion. Follows me for everything in the house. We have been working hard the two of us with her training. The AKC has a program called Canine Good Citizen that helps dog lovers work with their animals in a fun way, teaching them the skills and abilities they need to have happy doggies. Maggie is improving each week with her classes and shows it around the house. We work together each day to make sure she will be ready on test day. Therapy Dog Maggie is not to far away. 


Hope this gives a little insight to my blog info and the fun that will come and I update and show my projects. 

Love and light to all! 
E